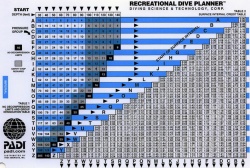
Divetalking » Adv. Open Water, Dive Planner, Divemaster, Diver, Divetalking, Education, Featured, General Question, Instructor, Master Diver, ocean, Open Water, RDP, Recreational Dive Planner, Reference, Specialties, Training » Understanding the Recreational Dive Planner, RDP
Understanding the Recreational Dive Planner, RDP
You are searching on the subject of the Recreational Dive Planner also known as the RDP. You found a good source for that information here at Divetalking.
During this Session, you will learn about the various ways to use the Diving Science & Technology Corp Recreational dive tables supported by PADI. From here on the DSAT Recreational dive tables sanctioned by PADI will be called, RDP.
Proper safety procedures and equipment should be utilized at all times when entering the water. We recommend acquiring the proper training from a local dive shop and experience before attempting to use any of the detailed information provided here at Divetalking.com. Never attempt to teach yourself or others what you learn using from this site. Improper execution could lead to injury or death.
The RDP is based on many years of research and factors, averaging the best numbers, with weight towards safety to calculate times. The RDP basic function is to provide a tool to calculate time. Whether it be surface interval times, bottom times, No Fly Times, etc… it is about calculating time. The Primary function of the RDP is to assists the recreational diver keeping the recreational diver from entering decompression.
If you are becoming familiar with the use of the RDP, Divetalking suggests you visit the article The Recreational Dive Planner – Instructions for use – PADI to learn how to use the RDP prior to reading this article.
The RDP contains legends and instructions to follow under certain circumstances. Your goal is to become familiar with the card, terminology and its use, to better prepare yourself for your Open Water Class or to help reinforce what you have already been taught, serving as reminders on how to perform steps to figure out, time.
What you are about to learn:
What is the RDP
What the RDP is comprised of
What each of the three tables of an RDP perform
How to use the RDP
What is the RDP?
The RDP is a tool, whether it be in the form of a card or electronic device, assisting the diver calculate time so that no diver intentionally go into decompression.
Let’s identify the features of the card, both front and back. We will then go on to learn how to use each table.
What does an RDP is comprised of?
Let us use the PADI Imperial RDP for the following reference.
The Recreational Dive Planner, RDP comprises of 3 tables, No Decompression Limits and Pressure Group Designation Table, Surface Interval Time Credits, and Repetitive Time Dive tables, Depths and Times and of course legends.
Beginning with the front of the RDP

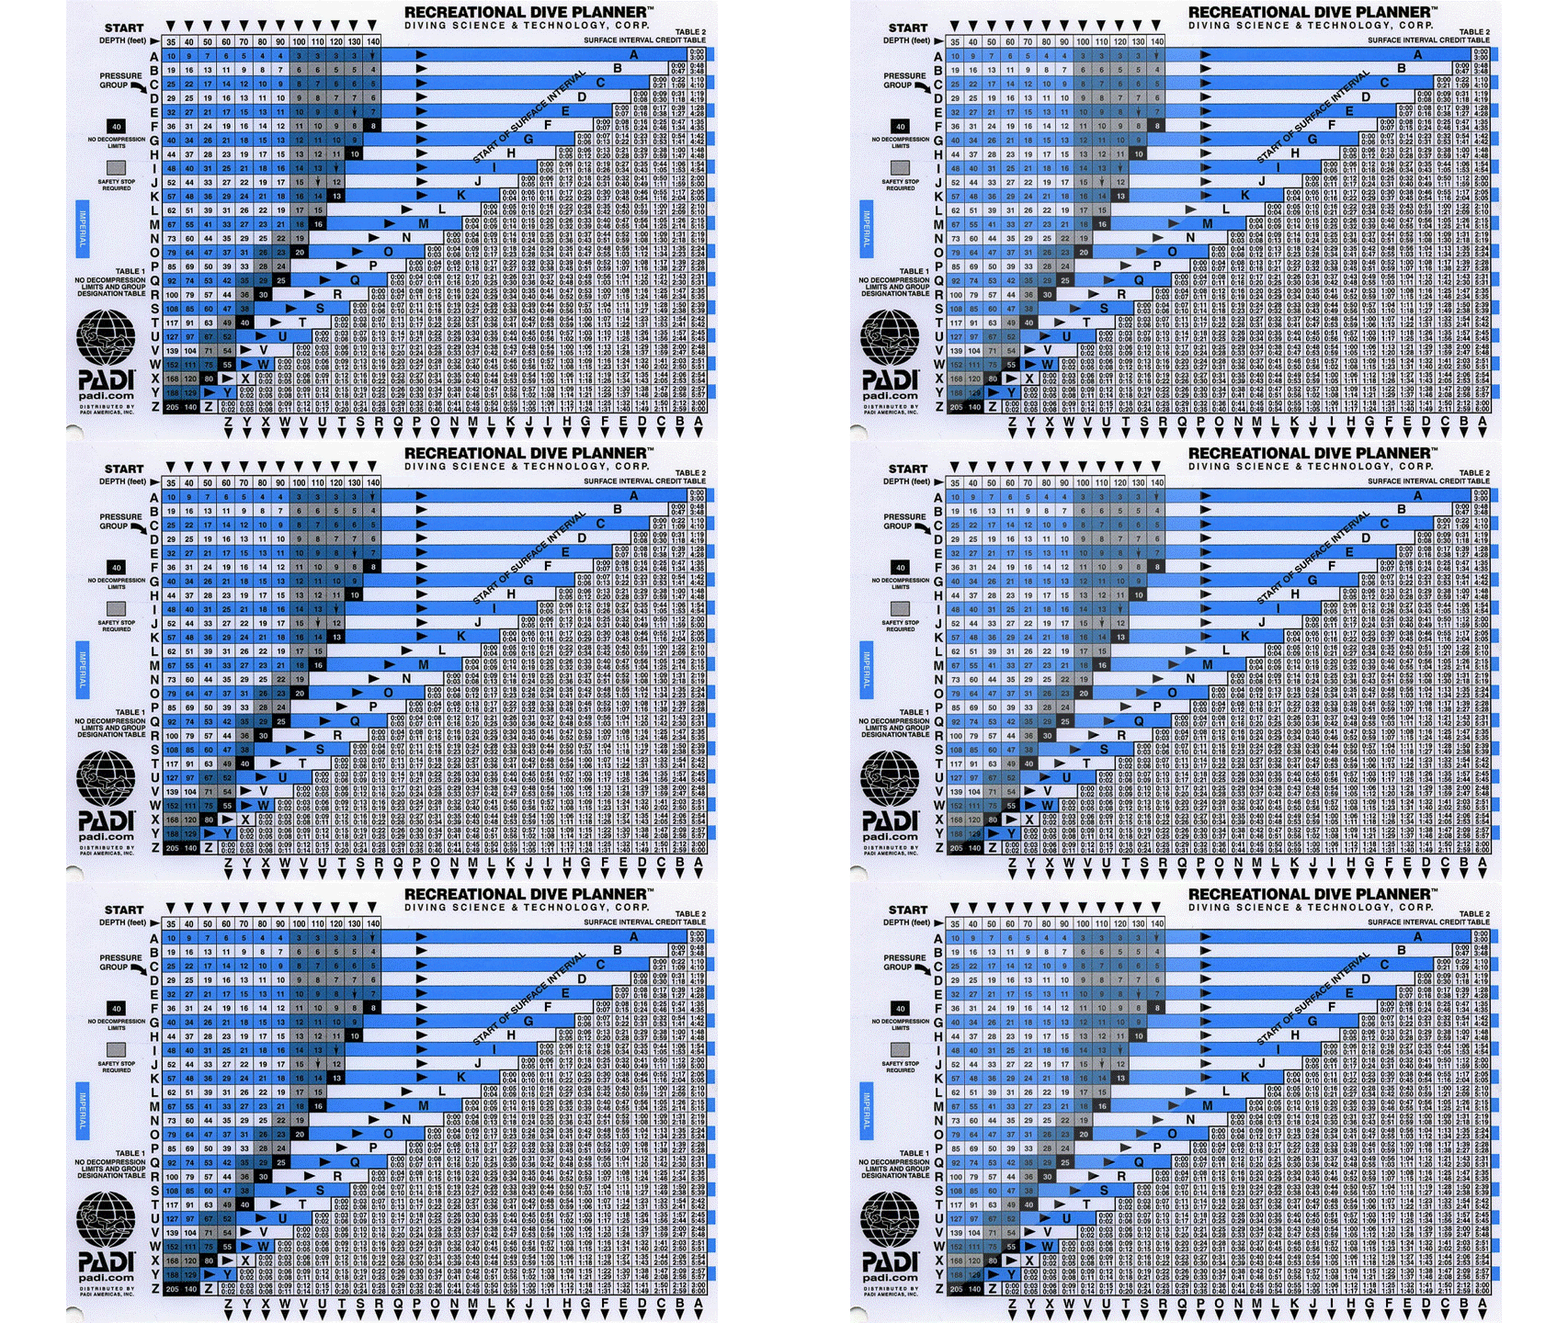
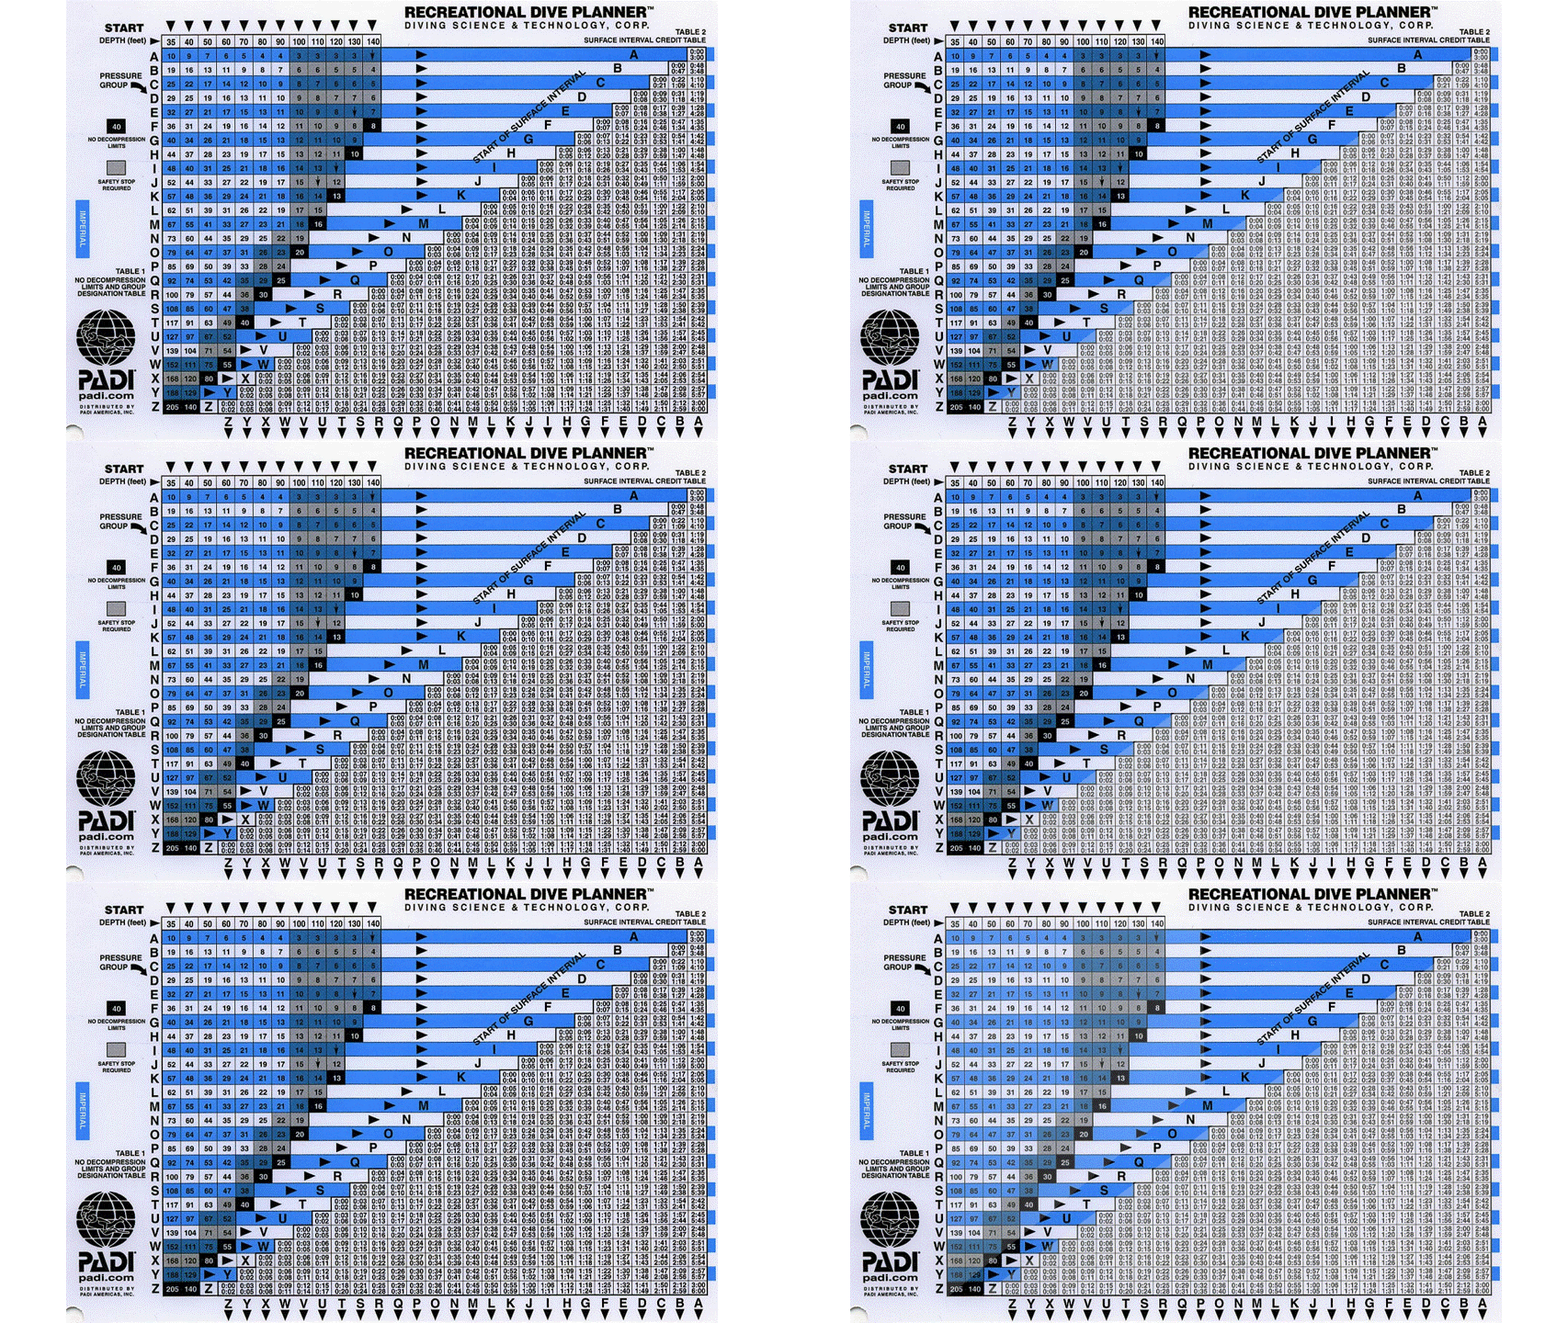
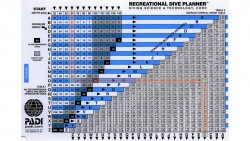
Using the depiction above, the left side boxed in green is a legend. Three descriptions fill that box. The first description is Pressure Group with an arrow pointing to the Alpha Characters to its right.
The Alpha characters boxed in blue represent a theoretical quantity of Nitrogen absorbed and stored in the body. Your body now has excess Nitrogen from when you first started the dive. (We’ll cover Nitrogen load in more detail later) and is known as the Group Designation Table
The second description is a Black box with a number in it. The number in the box is an example for the actual number found in each of the black boxes located at the bottom of each column inside the yellow boxed area.
The number represents the MAXIMUM time, in minutes one may spend at a given depth without going into decompression. Exceed the number in the black box and you just entered into Decompression, something we want to avoid in ‘recreational’ diving.
The third description is a grey box which represents whenever you reach a given time at a given depth, where that time falls within a grey box, a safety stop is required. (More on safety stop later).
Next, the large box in yellow is one of two tables found on the front side of the card. It is used to determine your No Decompression Limits and your Group Designation.
The second table is boxed in red on the right. This table is used to determine your Surface Interval Credit. Dive time given back to you for spending time at the surface.
Table 1 – No Decompression Limits and Group Designation Table(Surrounded by the yellow box), on the left
Table 2 – Surface Interval Credit Table (Surrounded by the red box), on the right.

What do each of the three tables on an RDP perform?
Let’s start by focusing on the table surrounded by the yellow lines, table 1, the No Decompression Limits and Group Designation Table.
Table 1 consists of a series of columns and rows.
The numbers found cross the top of each column represent feet*.
*Note: we are using the Imperial version of the RDP for this example. There is a Metric version and those numbers would represent meters.

The numbers running down each column represent time, in minutes. Time you plan to spend (planning a dive) or the actual time spent (completed a dive) at depth.

Running the length of the columns, on the far left side of table 1 is a series of alpha characters, the Group Designation. The Group Designation represent a theoretical amount of accumulated nitrogen found within the body.
How to use the RDP
Please note, though we start with table 1, you are not limited to starting at table 1. It is all depending on what the question is and how the answer to that question will be found. We start with table 1 because we are presuming for this scenario this is the first dive of the day.
If you have the plastic RDP available, take it out now. Also recommended is a straight edge, like a piece of paper or ruler.
Let us walk though a scenario. Let’s presume this is the first dive of the day. We will also presume our Group Designation is A.
We will cover table 2 after we walk through a table 1 scenario,
Starting with Table 1, the No Decompression Limits and Group Designation Table

Look at the top row, where you see 35 40 50 60 70 80. That top row, in feet represents depth. When locating depth, you look for the exact depth of your planned dive or the next highest depth if your exact depth can not be found on the table.
For example, If your planned dive was to 53 feet, you will have to use the next highest depth on the top row of table 1. That depth would be the 60. Always round the depth up when your exact depth cannot be found on the top row. Never round down.
It is the column of numbers below the 60 you will be using to determine your time and ending pressure group.
Looking down the column with the 60 in it, you notice a series of blue/white boxes. In each of those boxes is a number that represent minutes.


If you were preforming a dive to 53 feet for 36 minutes, you would scan down the column under the 60 until you find 36. Scanning down we find a box with 35 followed by 37. Note there is not a box with 36 minutes under the 60 foot column. Whenever you are looking up time and the time you are looking for is not there, you must select the next highest time.
In this case must select the next higher number, 37 minutes.
At this point, you rounded your depth up, from 53 to 60 and your minutes from 36 to 37. The reason is your exact depth and time were not located across the top row and exact minutes in the column below the 60.
Next, locate the Group Designation to the right or left of 37 minutes. You will come to the letter O. This is where having a straight edge helps, like a ruler.
What this means is after spending 36 minutes at a depth of 53 feet, you went from a Group Designation of A to a Group Designation of O.
What are Group Designations?
Group Designations represent the load of Nitrogen within the bodies tissues in the form of time.
The closer the Group Designation is to Z, the more load of nitrogen you have in your body and that correlates to a penalty of time taken away from your next dive. Your goal is to move towards the Alpha designation A. You do this through a Surface Interval.
Let’s take a small tangent to understand nitrogen loading and offloading as it pertains to the body. This will help in understanding the reason for table 2 and table 3.
A couple of fundamental concepts and understandings before we begin. The first being gasses within the body. Air is comprised of two primary gasses, oxygen and nitrogen, where the former is roughly 21% and the latter 79%. At sea level, your body is at equilibrium with the surrounding atmospheric pressure of approximately 14.7 psi (pounds per square inch, psi). At sea level, your body, fully absorbed comprises of 21% Oxygen and 79% nitrogen at 14.7 psi.
As you descend down the water column, water exerts pressure on the body, gasses compress and more molecules of a given gas can sit in the same space. Using 32fsw (feet sea water, fsw) the amount of pressure exerted on the body has doubled to 29.4psi (14.7*2). This means the gas bubbles have decreased in size by 1/2. The longer you remain at 32fsw, the more gas your body absorbs. The reason is the pressure outside the body is greater than the pressure exerted by the gasses inside the body. Gas will be driving towards the weaker pressure. You may know this as osmosis and diffusion.
To put that into numbers, if you had 1 million nitrogen molecules per square inch on the surface when at 32fsw you can have 2million nitrogen molecules per square inch. Twice that then on the surface. The longer you spend at depth, (the more time) the more opportunity nitrogen to accumulate. It will continue to accumulate until the gasses in the body come in equilibrium with the surrounding external pressure. Bubbles also may travel to locations within tissues they normally do not and may accumulate more trapped bubbles than on the surface because of their smaller size. When you begin your ascent towards the surface, gasses within the body begin to expand and begin to off gas or be expelled from the body. This is due to the pressure exerted by a given gas inside the body is greater than the pressure exerted on the body from outside the body. This escaping of gas from the body will resume until the pressure inside is in equilibrium with the pressure outside.
At the surface before the initial dive, your body is said to be saturated. Spend time at depth and your body is said to be supersaturated from its relative starting position(the surface). Return to the surface and the body will expel supersaturated gas until you return to a state of saturation.
Surface Intervals
This leads you to table #2, the Surface Interval Credit. Note the word, Credit. You are credited with time
when spending time out of the water. Time that you may use for your next dive.
Once you are done with Table #1 and you determined which Group Designation. You hop back onto the boat, or exit the water for a period of time before re-entering for your next dive. Spending time out of the water between dives is known as Surface Interval. Let’s look at Table 2, the Surface Interval Credit Table.
Table 2, Surface Interval Credit Table surrounded by the red line will tell you what Group Designation you end up in after a period of time out of the water, Your Surface Interval, SI. The more time you spend out of the water on your Surface Interval, the more time you are credited for your next dive.

Continuing with the example from Table 1, where you performed a dive to 53 feet for 36 minutes, exit the water in Pressure Group Designation O, on the line with the Group Designation of O, move across to the right and into the Surface Interval Credit Table, Table 2.


There are a series of boxes, each box containing a pair of numbers. They represent a range of time spent on the surface. For example the box with 29 minutes (0:29) to 34 minutes (0:34) is time spend on the surface between 29 minutes to 34 minutes. Another example is the range from 56 minutes (0:56) to 1 hour and 3 minutes (1:03) on the surface.
You exit the water for 1 hour and 10 minutes. Spending 1 hour and 10 minutes on your Surface Interval places you in Pressure Group, D.

This is where a straight edge comes in handy. A ruler or a piece of paper will suffice. You would scan to the right from Table 1 on the line for Group Designation O until you locate a box containing a pair of numbers inclusive to the time you spent out of the water. In this case, you spend 1 hour and 10 minutes and locate the box containing 1:04/1:12 which represents the range from 1 hour and 4 minutes to 1 hour and 12 minutes. Since you spent 1:10 on your surface interval, the 1:04/1:12 includes the 1:10 time spent.
Next scan DOWN the column containing the pair of times and you will find the letter D at the bottom.
This means exiting the water as an O, spending 70 minutes on the surface, you off gassed enough Nitrogen to move you from an O to a D. You are now a Group Designation of a D after spending 70 minutes (1 hour and 10 minutes) on the surface. Because you have spent time of the surface off gassing, you were credited with time. Time which you may apply towards your next dives bottom time. To learn how much time penalty remains you turn to table 3, the Repetitive Dive Table
So far so good, right?
For those who may need that extra boost of an explanation for what is happening, when starting your first dive of the day, you presume a Group Designation of A, in this example. Group Designation A is the group you always strive to return to. You spent 36 minutes at 53 feet. During the course of the dive you accumulated nitrogen within your bodies tissues. This accumulation was due to the external pressures on the body being greater than the pressure from within the body due to the weight of the water column sitting above you. The longer you remain at depth the more of a given gas your body accumulated. It is all relative to the starting pressure exerted on the body and this is from the point of sea level. When you begin your ascent, the excess gasses accumulated begin to be released. This is due to the external pressure of water lessening and the pressure inside the body being greater than the external allows for that excess gas to begin its escape. Descend and pressure increases, ascend and pressure decreases. Descend and accumulate, ascend and release.
Well, you have a second dive to do and you will be entering the water with a Pressure Group of D. Remember, you entered your first dive with a Pressure Group of A. Your second dive as a D. This means your body still contains some residual nitrogen from your previous dive. This is OK because you will take this into consideration for your second dive. You will essentially remove some time from your second dive so not to go into decompression. Let’s see how this works…
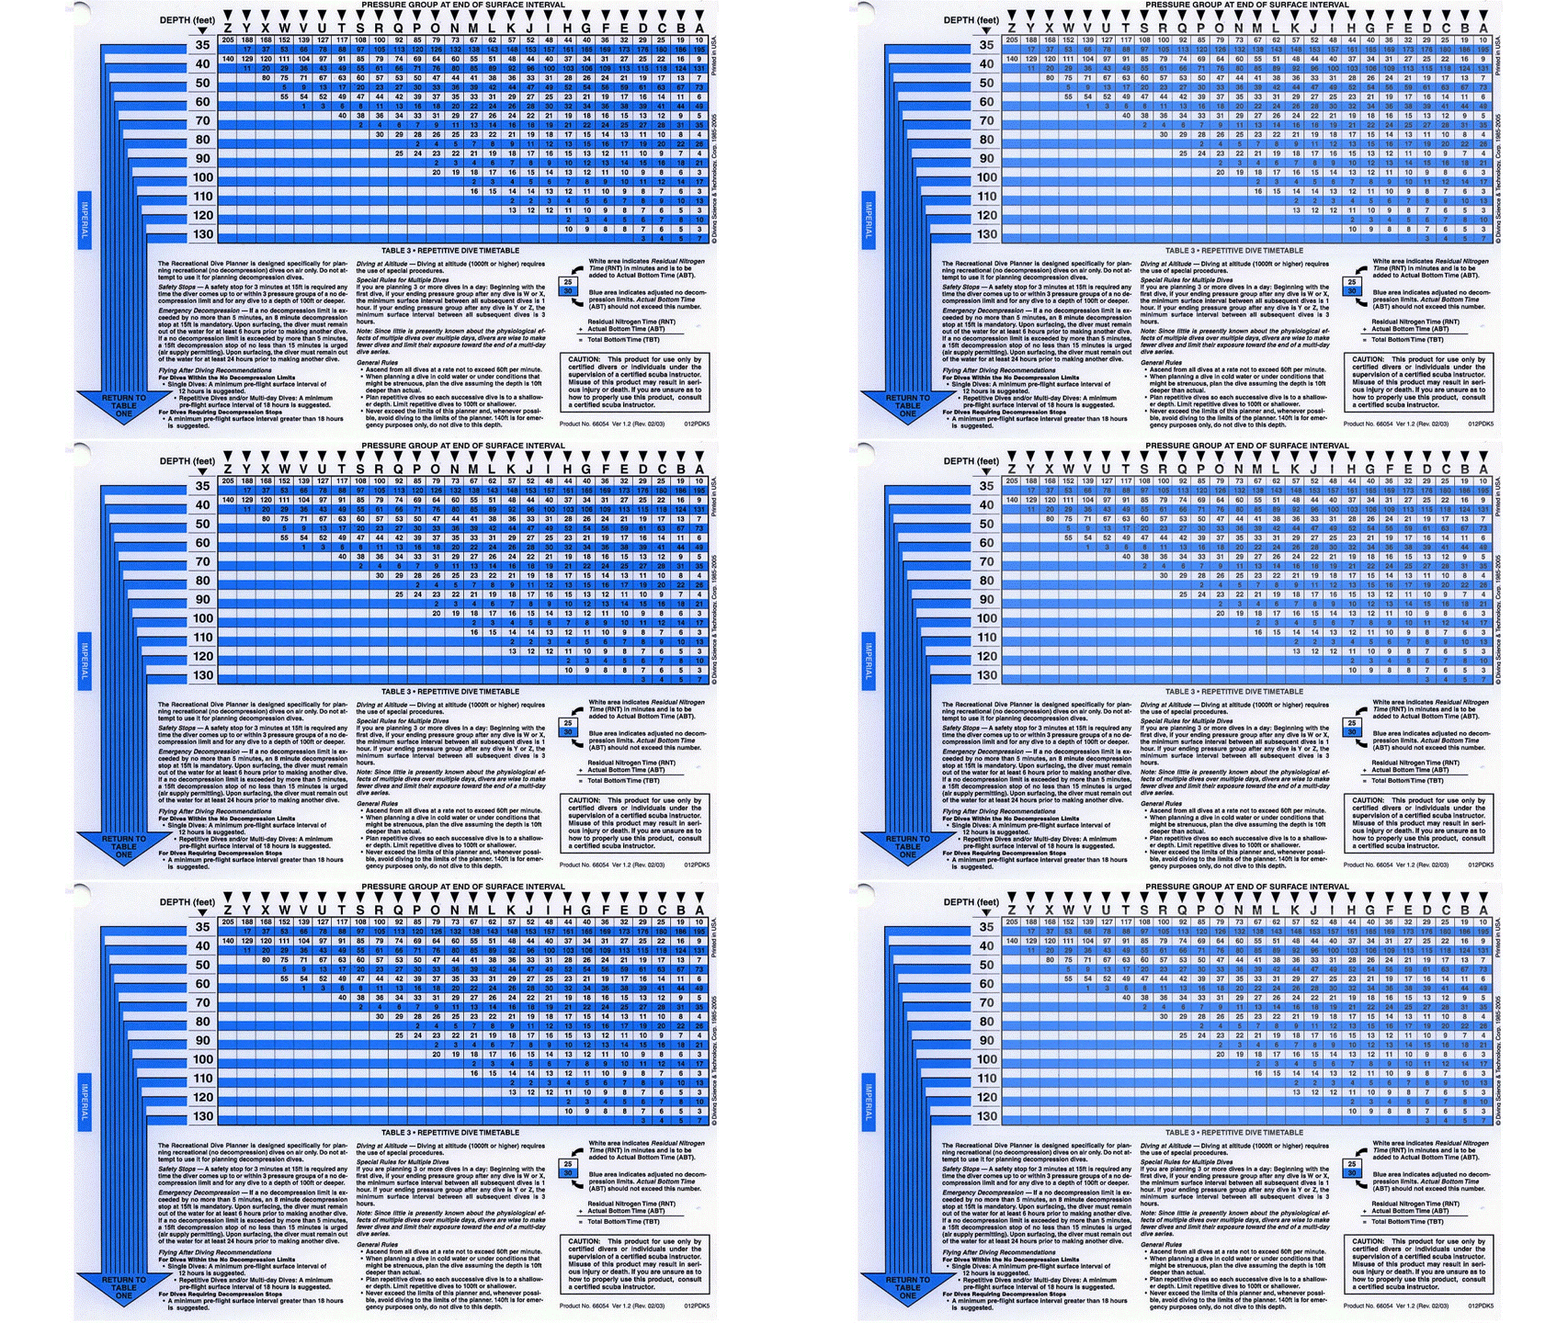
Turn the RDP over. You should be looking at Table 3, the Repetitive Dive Timetable. The table is intended to be flipped upwards, vs. left or right. See those arrows (Triangles), the point you in the direction to follow.
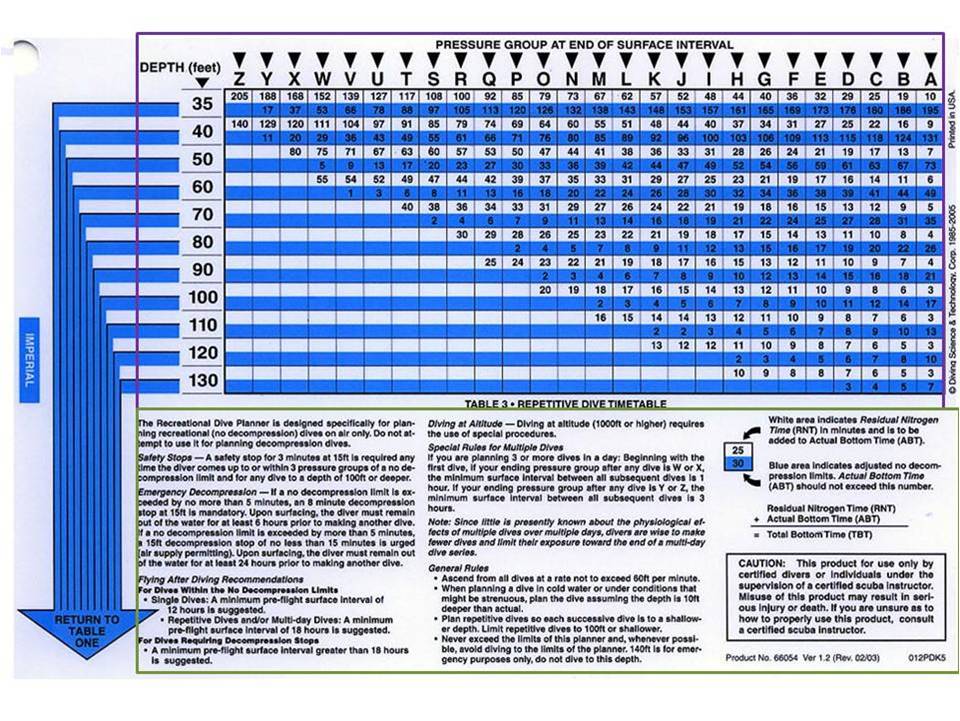
Locate Pressure Group D. The pressure group you entered after spending 1 hour and 10 minutes at the surface after your previous dive.

You will also need to locate the row representing the depth of your next dive. Remember, if you do not see the exact number for the depth along the left hand side, select the next higher depth. Let’s use 44 feet for the second dive. This means you must use the row at 50 feet, NOT 40 feet.
Follow down from the Pressure Group, D and across from the depth 50 where the two intersect. You will come to a box containing two numbers.


In this example, you should arrive to 19 and 61.
You ask, what do the two numbers mean? Look down at the legend for
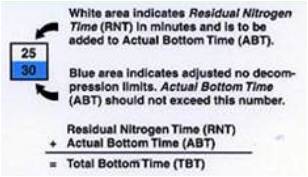
Let me explain what the two numbers mean and represent. Let’s start with the top number, the one in the white box. Remember the comment earlier about residual nitrogen? After spending only 1 hour and 10 minutes on the surface your pressure group was a D. The D represents residual nitrogen still within your body tissues. In the legend the Pressure Group Designation is represented with time, RNT and that time needs to be add to the Actual Bottom Time, ABT of your next dive. The number in the white section, 19 is added to your actual bottom time, where your actual bottom time cannot exceed 61 minutes, the number in the blue section. The 61 minutes is known as your Adjusted No Decompression Time, ANDT. Knowing your Actual Bottom Time may not exceed your ANDT, 61 minutes in this example, you plan on a time at depth to be less than 61 minutes. The time you choose for your Actual Bottom Time is added to the 19 minutes of Residual Nitrogen Time which equals your Total Bottom Time.
If you detour for a second to table 1 and locate the NDL for 50 feet, you will find 80 minutes. That is the number found in the black box at the bottom of the 50 foot column. The 80 minutes would be the maximum time you may spend at 50 feet. It is known as the No Decompression Time. If you Actually spent 80 minutes at 50 feet on your first dive, your ABT would be 80. After your first dive and a 70 minute surface interval, your ANDT to 50 feet is now 61 minutes. It is no longer 80 like you found on table 1. The reason, you have 19 minutes of penalty against the 80 due to the residual nitrogen remaining in your body after the 1 hour and 10 minute surface interval between your first and second dive. 80 – 19 = 61. 61 is now your Adjusted No Decompression Time. Make sense?
This is the most common error divers make when calculating time, forgetting to add the RNT to their ABT. Forgetting to add the RNT will place you in a lower pressure group where the amount of accumulated nitrogen is not being taken into account. The continued accumulation of nitrogen in your body moves you closer towards getting Decompression Sickness, DCS.
To continue the example of making that second dive, the question you are asking is, how long will we spend at 44 feet? It cannot be more that 61 minutes. Let’s agree on 45 minutes..
You make the dive to 44 feet for 45 minutes, using table 1, what pressure group do you end the dive in?
If you figured O because you found the 47 minutes under the 50 foot column you would be correct if this was your first dive BUT that is not correct. Remember the 19 minutes found in the white box in table 3? The 19 represents residual nitrogen still in the body in the form of time. This means you start your dive at 19 minutes. You then stayed at 44 feet for 45 minutes of actual bottom time, making the total bottom time 64 minutes (19 + 45). Knowing now you must add the number from the white box, table 3 to your actual bottom time to determine your total bottom time. Looking at the 50 foot column for 64 minutes, we find a 63 followed by a 67 minute box. We must use the higher number, 67 making our pressure group at the end of the second dive a U. Look at the legend again. The White Area indicated what?
RNT + ABT = TBT
19 + 45 = 64
Now, you may be asking, what if I am planning a 3rd and/or a 4th dive on this day, how do I calculate those dives? Simple, you repeat the cycle of finding your pressure group (RNT+ABT=TBT), follow that Group Designation to table #2 (Surface Interval Credit), follow that column down to Table #3, locating the pair of numbers (white/blue) where the Pressure Group Designation after your surface Interval and the depth for the next dive intersect to find your new ABT and RNT, etc… continuing this cycle for each dive that day.
Question for you. When scanning down the column found on table #1 for a planned dive to 64 feet, which column would you use? The 60 foot column or the 70 foot column?
What you have learned:
What is the RDP
What is an RDP comprised of
What does each of the tables perform
How to use the RDP
Should you have any questions, comments on this post, please feel free to contact the author.
Other resources:
The Recreational Dive Planner – Instructions for use
Take the Recreational Dive Planner Quiz
© 2013 – 2022, admin. All rights reserved.
Filed under: Adv. Open Water, Dive Planner, Divemaster, Diver, Divetalking, Education, Featured, General Question, Instructor, Master Diver, ocean, Open Water, RDP, Recreational Dive Planner, Reference, Specialties, Training · Tags: divetalking, How to use the RDP, How to use the Recreational Dive Planner, Learn about the RDP, Learn about the Recreational Dive Planner, Learn how to use the RDP, Learn how to use the recreational dive planner, Learn the use of the RDP, Learn the use of the Recreational Dive Planner, RDP, Recreational Dive Planner

