Buoyancy & Trim
You hear it all the time, get neutrally buoyant. Remain neutrally buoyant. Get off the bottom. Control your ascent. Stop floating upwards.
Don’t use the inflator as an elevator.
What do all these common saying have to do with objects, including yourself floating or sinking in water?
To answer the question let us first get some terminology and concepts out of the way. The terminologies will be used throughout the article. Having an understanding to their meaning will aid in applying that knowledge to the How and Why questions.
Expectations and presumptions to remain consistent and not become redundant.
- The article will presume Sea Water vs. Fresh Water unless otherwise noted. There is a difference in how forces act upon an object in both types of water. An example of Fresh Water will be provided later as a comparison to Sea Water.
- We will not consider and factor in the height of the object and the difference in forces between the two extremes, top to bottom yet you now know that the height does factor into a formula to determine the forces acting upon the object.
- The article will not go all out scientific on you and provide you with all the different formulas used to figure out buoyancy, displacement, etc.. but will convey the concepts of buoyancy and displacement with the hows and why at a level to provide an understanding without going scientific ape on you. You’re smart enough to understand there is much more science behind the examples and explanations.
- Near the end of the article, links to resources that provide more in-depth information are provided.
- We will work at a constant temperature. The density of water changes with temperature.
Terminologies and definitions:
Displacement:
The movement of water out of the way to make space available for an object.
The space occupied by a submerged body or part of a body which would otherwise be occupied by a fluid.
Archimedes’ principle:
“Any object wholly or partly immersed in a fluid is buoyed up by a force equal to the weight of the fluid displaced by the object.”
The upward buoyant force that is exerted on a body immersed in a fluid, whether fully or partially, is equal to the weight of the fluid that the body displaces.
Boyle’s Law
“For any gas at a constant temperature, the volume of the gas will vary inversely with the pressure.”
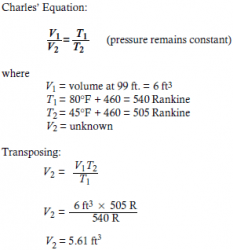
Charles Law
“For any gas at a constant pressure, the volume of the gas will vary directly with the absolute temperature or for any gas at a constant volume, the pressure of the gas will vary directly with the absolute temperature.”
Density
Density can be defined as weight per unit volume.
Expressed mathematically, Density = Weight/Volume or D = W/V
Density is expressed in pounds per cubic foot (lbs/ft3) or in grams per cubic centimeter (g/cm3).
Measurements:
One cubic foot of sea water weighs approximately 64 lbs
One cubic foot of fresh water weighs approximately 62.4 lbs.
One cubic inch of sea water weights approximately 0.037037 lbs
There are 1728 cubic inches in a cubic foot (12x12x12)
1728 cubic inches of sea water weights ~64lbs
1728 * 0.037037 = ~64lb cf
A column sea water 12 cubic inches in height weights .445 lbs
12 * 0.037037 = ~ 0.445
One atmosphere of air weights 14.7 psi
Equations:
P1 = initial pressure surface absolute
V1 = initial volume in cubic feet (ft3)
P2 = final pressure absolute
V2 = final volume in cubic feet (ft3)
Immersed weight = (Weight of Object) – (Weight of Displaced Fluid)
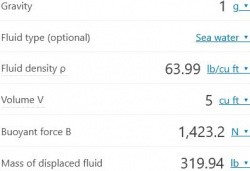
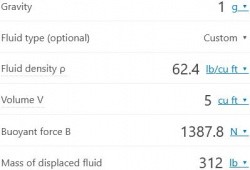
Fb = pV g (Archimedes)
Calculator
All the information above is to simply provide you with resources and supporting examples. It is not required to fully comprehend the information above to continue with the intent of the article.
To get started, let’s look at Archimedes’ Principle and the statement An upward force on an object immersed in a fluid is equal to the weight of the fluid that is being displaced. What questions arise from that statement?
- What is the fluid? (We are using Sea Water in our examples)
- How much of the fluid is being displaced?
- How much does the displaced fluid weigh?
- How much downward force does the object produce?
- How much upward force does the displaced fluid produce?
“Any object wholly or partly immersed in a fluid is buoyed up by a force equal to the weight of the fluid displaced by the object.” With that statement we can say that when the upward force acting upon an object is greater than the downward force the object will float. If the upward force is less than the downward force of the object, the object will sink and if the upward force equals the downward force, the object is said to be neutrally buoyant.
We will presume the weight of a given fluid is fairly consistent, hence sea water has the weight as described above and we are not factoring other catalysts such as temperature, viscosity, pressure, gravity, and altitude for example into the equation. The question which we must ask is “How much fluid does an object displace?” When you know the quantity of fluid displaced along with the type of fluid, you can find the weight of the displaced fluid. Knowing how much an object displaces and the weight of the displaced fluid you can determine the amount of upward force.
For example, let say you were called in to lift an outboard engine that sits at a depth of 100ft on the ocean floor. We can easily say there was not enough upward force to keep it afloat (because it sits on the bottom). How much fluid must be displaced to raise the engine to the surface?
You will need to know the weight of the engine and the amount of fluid the engine displaces. The difference is the weight that must be displaced. That weight converts to a quantity of fluid and displacing the difference should make the objective of raising the engine possible.
Let say for example the engine weights 580 lbs. The cubic feet of fluid it displaces is 3cf. How much lift, or how much sea water must you displace in order to bring the engine to the surface?
Lets tear this down to the known facts:
- The object weights 580lbs
- The object displaces 3cf of sea water
- 3cf of sea water weights 192lb ( 3 x 64 )
- It takes a approximately 9cf of sea water to bring the engine to neutral buoyancy
- 9cf – 3cf = 6cf of sea water needs to be displaced
Technically it is more involved than figuring out the above but for the purpose of getting a concept across, it will work.
How big of a lift bag will you need to displace 6cf of sea water to raise an item from 100fsw?
One would think a bag that has a lift capacity of 388lb (580 – 192) will be enough. What must be considered is the expansion of air as the bag rises through the water column. That expanding air must go somewhere. One must also consider the weight of the water column sitting on top of the object and how that weight is reduced as the object rises.
With the number of atmospheres at 100fsw being 4 ((100/33) + 1), the weight of water pressing down on the object is 3 times that found on the surface or 44psi. Air is compressed to 1/4 the size at depth and will expand 4 times its size when reaching the surface. These things combined when the water you are displaying begin to add enough upward force, the object will be able to be lifted from the bottom and raised to the surface. As the object begins its ascent the weight of the column of water lessens, air begins to expand and more water begins to get displaced. I think you get the picture. If done incorrectly you would end up with an uncontrolled rocket heading for the surface with the possibility of some form of failure where the object will sink back down to the bottom.
The last two paragraphs goes beyond the scope of the article. It was included as an example to show there is more than figuring displacement when considering the task.
You hear it, get neutrally buoyant. Remain neutrally buoyant. Get off the bottom. Control your ascent. Stop floating upwards. Don’t use the inflator as an elevator.
Your goal as a diver is to get trim and neutrally buoyant so you remain off the bottom, don’t sink or rise uncontrollably, so you’re not rising and falling like a roller coaster as you travel.
What steps can you take to aid in your quest to perfect that trim and buoyancy? It starts on the surface. I cannot presume you are new to diving, just someone interested in learning ways to become trim and neutrally buoyant.
If you are a new diver, your lessons in buoyancy started in your Open Water Training Manual and continued throughout your training in and out of the water. Like anything that you are introduced to that is new to you, repetition, observations, and looking for information to support ways to better your trim and buoyancy.
Things to look for
- Equipment
- Wetsuit
- Thickness (1mm vs. 7mm)
- Full or shortly
- Drysuit
- neoprene
- vulcanized
- trilaminate
- No exposure protection
- Cylinder (tank)
- Fins
- Weight
- Stability (Ability to push)
- Buoyancy Compensation Device, BCD
- Minimal vs. large (ie. EMS size like the Zeagle 911)
- back or side inflate
- Wetsuit
- back mounted, side mounted and rebreathers
- Back mounted equipment can be
- single tank
- dual tanks
- side mount
- Cylinder placement is parallel to and along the side of your body
- Rebreather
- self contained loop
- bailout bottle
- tanks (40cf on back) or a side mount configuration
- Back mounted equipment can be
- Placement (of your life support)
- Tank high or tank low
- weights on hip/waist
- weight belt and/or integrated
- Weighting
- Quantity
- placement
- Where the weights located
- Back, hips, small of the back
- Where the weights located
- Traveling technique
- Water
- Salt or Fresh
- Current
- Center of gravity, trim
- Where is your center of gravity located
- vertically
- horizontally
- Where is your center of gravity located
Looking at some of the major pieces listed above, No one piece acts as the sole answer to buoyancy or trim. It is a combination when properly managed gets you to your goal of near perfect trim and buoyancy.
Wetsuit
We know the thicker the wetsuit the more lift you will have. The more lift you have, the more weight you may need to wear. We know neoprene compresses as we descend reducing its lift and thermal properties. The point being made with wetsuits is you may wear different styles and thicknesses determined by the type of diving you are doing. This changes your trim and buoyancy and will require gear reconfiguration.
Drysuit
Drysuits vary in material as mentioned above. If you dive primarily cold water, you may be looking at a crushed neoprene drysuit. Water that may be between cold and tropical you will be looking at trilaminate. The vulcanized drysuits are usually reserved for hazardous material diving, such as septic tanks, etc.. Each type of drysuit introduce their own set of challenges when buoyancy and trim come into play.
Someone wearing a trilaminate in conditions where long exposure to moderate temperature, say 72 degrees will wear thermal protection underneath the drysuit. What they wear will affect the buoyancy and trim.
You also have the condition where air travels within the drysuit. As you decent the water column, a diver will inject a gas into the suit to compensate for the squeezing force of water pressure. As they rise, the trapped gas must be released. It is this gas, trapped in the drysuit that travels towards the feet when tipped head down and towards the neck and arms when tipped heads up. This traveling gas affects your trim and buoyancy,
Tank
Tanks have a buoyancy characteristics of their own. Tanks are made of aluminum and steel. Their alloys differ as well as their size. Tanks weigh more when full than when near empty. As you breath the gas down the tank becomes lighter and this changes your buoyancy. When testing for neutral buoyancy, test at a shallow depth with a near empty tank. When considering tanks look at your current diving profile and find a tank that best compliments your type of diving.
Fins
This is one piece of equipment where there is a wide arrangement of choices. Open Heel, spring straps, rubber straps, split fin, sturdy, flexible, light, heavy. Choose a fin that suits your style. As you discover your trim you may use a different pair of fins to suit the gear you wear. For example, in a drysuit, you may be feet heavy so need a lighter pair of fins. While in a wetsuit, you’re feet light and need a heavier pair of fins. When you have the opportunity to try a different pair, ie swap or borrow a buddy’s take that advantage and learn from it.
Buoyancy Compensation Device, BCD
This is another piece of equipment where there is an assortment. There are Jacket style, back inflate, wings, steel/aluminum/plastic back plate. There are some that have all sorts of bells and whistles and some that are minimal. Some with single and some with dual cam bands, with and without cummerbund, single and dual torso straps, with or without chest strap, with or without a crotch strap, and so forth. You may find as you begin diving more frequently, travel may be in your picture. You certainly do not want to travel with a heavy BCD so you would have a smaller, lighter one for travel, giving up features your ‘at home’ BCD has.
At this point, you have your gear, BCD, Weights, Wetsuit/Drysuit, Fins, Cylinder, the pieces of equipment which most affect your trim and buoyancy.
Weights
How much weight should I carry? Ever heard that question before? Your experience with How Much Weight started in your Open Course. Not ever have been diving before, with all that equipment how would you know? Your instructor taught you how to perform a weight check. OK, so it’s been awhile since you were open water trained or perhaps it’s been awhile since you went diving. What do you do then? Use what you recall would be a good starting point.
The best way is to perform a buoyancy check. How is this performed? While fully geared up, your tank near empty and on the surface, second stage in your mouth, mask on, take a deep breath and HOLD YOUR BREATH while you deflate ALL THE AIR form the BCD. If you remained on the surface, you are under weighted and need at add more. If you sank slowly, you are probably properly weighted. If you sank like a rock, you are over weighted and can remove some weight.
Your goal is to be able to remain neutrally buoyant, with a near empty tank in around 1-2meters/5ft of water. The idea is at the end of a dive, your tank will be near empty, which means you will be lighter at the end of a dive than when you started due to the loss of weight from breath down the gas in your tank. Maybe 2.5- 3kilo/4-5 pounds lighter.
To add to the neutrally buoyant goal mentioned above is the ability to over horizontally from a shallow depth.
This means the type of weight(s) and the placement of those weights are as important as the amount of weight carried.
Buoyancy
Let’s talk about what you can do with the equipment you’re wearing to help remain near perfect neutral buoyancy and trim.
Let’s start out with buoyancy, where you find you are sinking and you must continuously add air to your BCD. The first thing that comes to mind is you are too heavy. Whatever it is you are wearing has added enough weight to make you too negative. First thing that comes to mind is remove some weight. Your goal is to main neutrally buoyant while near the surface on a near empty tank. If you find yourself near the surface sinking with an empty BCD on a near empty cylinder, you are definitely over weighted. Remove some of the weight. If you’re wearing 4kilo/10lb remove 1kilo/2lbs and test again. Continue to adjust the amount of weight until you are able to hover with a near empty cylinder.
By the way, does it matter if you’re testing in salt or fresh water? Does it matter what you are wearing? The point is what ever you discover it is discovered while outfitted with specific configuration. Change one thing and your buoyancy can change.
Let’s presume you got yourself dialed in. You’re hovering without flailing, kicking, holding your breath, etc. You know exactly how much weight to wear now. You are hovering comfortably and you like the feeling. Let’s make one change. Swap out your tank for a full tank.
With everything else remaining the same, will you be heavier or lighter? Heavier of course. Why, because the compressed gas in your cylinder has weight. You may be 2-3kilos/4-5lbs heavier. Would you remove some weight before you start diving? No. Why? Because if you do, at the end of the dive, on a near empty tank, you will be too buoyant because of the gas you breathed from the cylinder during the dive. The tank became lighter because of it. The motive is to remain neutrally buoyant on a near empty cylinder at the end of the dive, where your safety stop will occur. You do not want to be rising to the surface, fighting your way back down to be pulled up. It’s frustrating, uncomfortable and unsafe.
When you get dialed in, you shouldn’t have to tap on that inflator until you reach maybe 20+meters/60ft and that’s a great feeling. You want Minimal air in that BCD. If you are down 30meters/100ft, hopefully your BCD has had very little air tapped/injected into it. The more air you inject, obviously the more buoyant you become but air travels when you move and when air travels, you begin to get sloppy.
Trim
Trim is where the intersecting lines of center of gravity cross. This is your sweet spot. It’s different for everyone.
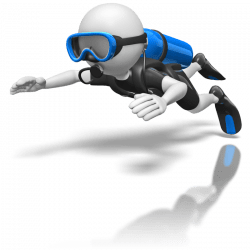
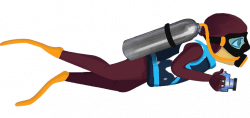
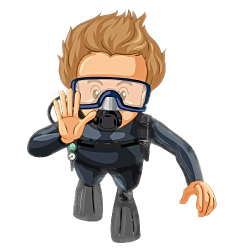
Immediately below shows a diver who is horizontal and trim.. Their body is horizontal to the surface and their trim does not have them tilted head or feet down.
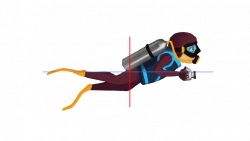
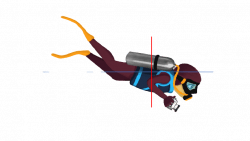
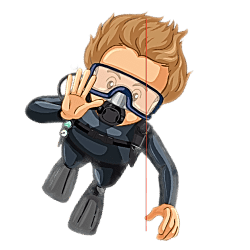
Below you find two depictions of that diver whose trim is off. The first depiction shows a divers who is tilted head upwards while the second depiction is one depicted head downwards. The red vertical line on the first diver has moved back meaning the weight has moved back, dropping the leg region and lifting the torso region. The second diver’s center of gravity has shifted forward, depicted by the red vertical line moving towards the chest region, causing the diver to tip forward and lifting the leg/feet region. The shift may have been intentional, to look up and over in the case of the first depiction and in the second the diver wanted to keep their feet off the coral but tilt their torso downwards to get a better look at a subject. In no case should you be teetering or traveling in this position unintentionally.
This isn’t to say you should never be in an upward or downward position. Your goal is to be like the first depiction while traveling or hovering horizontal.
Please don’t get me wrong. There is a time where you will position yourself heads up, feel down. This is the nature of diving. To pose for a photo for example, to look down and under an object while keeping your feet/fins up to prevent causing any damage. To relax the neck muscles, hover cross leg etc.
Let’s take a look at that other line, the one running parallel with the body. When you are not tipped left or right and essentially parallel with the surface. Your center of gravity runs along the mid-line of the body.
When the same diver above moves the center of gravity to their left, they will lean to the left. While moving the center of gravity to their right, they will lean to the right as shown below.
Center of gravity moved toward the divers left 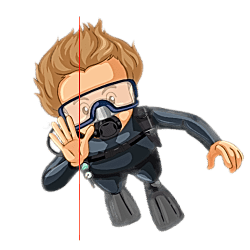
Center of gravity moved towards the divers right
You have seen there is a sweet spot, where two lines intersect. That moving a line from the sweet spot towards the feet lowers the legs/feet in the water column. Moving the line towards the head and you begin to tip head first making the head lower than the feet. The same goes for left and right of the lateral line. Move the center line towards your left side and you lean left, to the right and you lean right.
By this time you are getting the picture that there is a lot to consider when it comes to trim and buoyancy, and you would be right. It is something you will get in tune with the more dives you do and the more configurations you experience. If trim and buoyancy were impossible to manage, there may not be as many divers as there are. The things mentioned above are points to consider, pay attention to and perhaps even help answer the what and provide the why leading to the how.
With what you were introduced to will help for example if you find yourself consistently feet heavy, you know to get those feet raised, you must move that line towards the head. How and how much to move that line is to be determined.
Lets use the feet heavy as a scenario as what can be performed to regain that trim and buoyancy. Let’s look at a few things that can be performed to help. It may not be a perfect solution but it may get you through the next few dives until a more permanent solution is put in place.
One thing you can consider is to move the cylinder in a position higher towards the head. You do this by securing the cam ban, the strap used to secure the BCD to the cylinder lower onto the tank. This will in effect move the tank towards the head when the BCD is in place. Don’t raise it so high the the back of your head is hitting the cylinder valve.
Another option is to move weights towards the head. Now if you were using an integrated BCD, that is where the weights are in a pocket that is part of the BCD, moving weights towards the head may not be an option. Some BCDs have pockets on the back of the BCD. Some that can be placed higher on the BCD. Note, when placing weight on the back, you are not just changing the center line forward but upwards making you back heady leading to tipping. What if you were wearing a weight belt? You could secure the weight belt a little higher on the body.
You could wear a pair of fins that are lighter than what you are currently wearing. The objective is to raise the feet. A few of these techniques can be performed in the field. The changing of fins may not be immediately feasible, but it is an option.
Concluding
You have certainly been introduced to a lot of information. Your bucket of knowledge and tricks filled with all sorts of definitions, formulas, concepts and ideas. You have been introduced to some of the individuals who helped define why we dive the way we do, the things we need to be aware of and why. Individuals such as Archimedes, Boyle, and Charles. We did not bring up Darwin. No awards there.
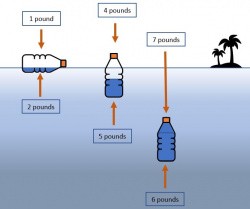
You have also have been presented with formulas, and buoyancy calculator. Moving on to an example of the forces involve with buoyancy we say a bottle in different stages of downward force and displacement (upward force) where the downward force eventually became greater than the upward force and the bottle began to sink.
Next we looked at factors involved with raising an boat engine from 100fsw. Considering the downward force of the engine, the weight of the water it displaced, the discovered the difference between the two extremes and brought out considerations, concerns to raise the engine to the surface.
Listed were things to look for when considering buoyancy and trim followed by number of more defined thoughts such as placement, equipment used and more.
Then you saw that diver. The one that was horizontal and trim. You learned there is a sweet spot, a set of imaginary lines that represent center of gravity and moving any line either forward or backwards, left or right, up or down will deviate your trim and/or buoyancy away from the center of gravity having you leaning head or feet heavy, leaning left or right, or rising and falling the water column.
When someone is new to diving, there are a lot of senses working, collecting information, consciously and subconsciously. When you recognize a challenge you begin to focus on the challenge and process what is happening and the reasons for it. Without the knowledge and experience, you begin to mention it to others. You ask questions as to the reason for it and how to correct it.
Your book of knowledge begins to grow and you are able to factor in more and more variables to see which ones, in which combinations and the degree they play in solving the challenge at hand. From that you begin to overcome and manage challenges, faster, more efficiently and eventually the confidence builds and you will start to offer your own objective opinions when others need your help.
Resources
What is buoyant force – Khan Academy