Divetalking » Diver, Divetalking, Education, Open Water, RDP, Recreational Dive Planner, Reference, Training » Calculating No Decompression Limit, NDL
Calculating No Decompression Limit, NDL
We will start with the DSAT Air Tables. simply known as the Recreational
Dive Planner, RDP.

Using your DSAT Air Table, position the card so it looks like what you
see above.
Dive tables, what are they? Why do they exist? Why do I need to understand
how to use a dive table? If I have and use a computer, do I still need to know
how to use a dive table?
Dive tables may be found in many forms. They may be online, on a hard
plastic, water proof card, they may be flexible and/or foldable but what they
all contain is a method to calculate our bottom times, surface interval times
based on our planned depth, time at depth and our time between dives.
Is it important to know how to work your dive tables? One question
asked “If I’m wearing a computer and the computer calculates
all that stuff about my depths, times, surface times, and tells
me when to come up, when I can go back into the water, do I
need to understand dive tables?” That is true and a good question.
What happens when your computer fails or your transmitter fails? What
do you use then? Computers failing have happened four times to me.
Another reason to know your tables is it is the basics. Understanding
the fundamentals will make learning more complex calculations easier
should you decide to advance towards deeper or technical diving.
Table 1, the No Decompression Limits and Group Designation Table.
Let’s get familiar with the tables. Looking in the upper Left Corner of the card you
will find the word START. The column of words below the START act as legends.
Just below START you find, DEPTH (feet) > followed by a row of boxes with
numbers in them. Those numbers represent (feet).
(Your RDP may read meters and your boxes of numbers will represent meters)
Each one of the Depths have a column of alternating blue and white boxes.
The numbers in each of the alternating boxes represent TIME at depth.
For example: Locate the DEPTH for 60 feet. Following the column of numbers
found below the 60 foot box, they lead you to a BLACK box with the number
55 in it. So far so good.
The numbers found below the depth box are minutes at that depth. For example
the numbers found below the 60 foot column are 6, 11, 14, etc..
Locate the Alpla-characters on the LEFT side of the card. The letters run
downwards from A to Z. These characters are an alpha representation of
some amount of Nitrogen loaded into your tissues due to the pressure of the
depths you plan to dive. We need to know this to keep track of the amount of
Nitrogen building up in our tissues. We must take the appropriate action to
“off gas” that extra nitrogen, either before we surface, as in a “Safety Stop” or
during our “Surface Interval.”
Using the 60 foot column, move down to the box containing 33. Following
the row to the left, it leads you to one of those Alpha Characters. The Aplha-
Character, Pressure Group you should have identified is . . . . M.
Therefore a planned dive to 60 feet for 33 minutes places you in the
Pressure Group, M when you leave that depth to end your dive.
Let’s expand that Pressure Group thingy a bit. The Pressure Group is
based on all sorts of results from scientific studies , formulas, dopper
mapping of air bubbles, and more. We as consumers trust the tables and in
using them understand that the tables do not take into consideration all the
differences we have physilogcally, psychologically. This means that while
two individuals follow the exact same profile, one may feel the effects of
gasses more than another.
Getting back to the example of ending the dive as an M diver, our goal is
to drive our nitrogen load from its M position on the Pressure Group down
towards the A character, always. We do this by lessening the pressure and
we lessen the pressure simply by rising in the water column.
Continuing, you exit the water from the dive as an M diver. That leads us to table 2,
the bottom right half of the RDP. Table 2 is our Surface Interval Credit Table.
This table credits you back with time that can be applied towards your next dive.
Again, located the 60 foot column and the 33 minute block. Moving towards
the right, we find an Alpha, M and to the right of the M are small squares. Each
square is cut in half containing a time-range. The first block contains 0:00 / 0:04.
that represents the range from 0:00 minutes to 0:04 minutes on the surface.
The next block to the right contains 0:05 / 0:09 and represents 5 to 9 minutes
on the surface, etc. Let’s say you plan to spend 58 minutes on the surface between
the dive you just completed to 60 feet for 33 minutes and your next planned dive.
If you follow the column down from the block containing 0:56 / 1:04, you will find
the Alpha character D.
What does the above all mean? It tells you that after exiting the water as an M
diver and spending 58 minutes on the surface, enough Nitrogen has theoretically
has been removed from your body to move you from Pressure Group M to
Pressure Group D. Remember that your goal is to always move towards the
Pressure Group A.
Now, turn the card over. The design is to flip the card bottom up and over, vs
like a page in a book. You should see Table 3
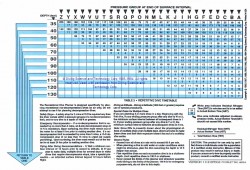
Table 3 is the Repetative Dive Timetable and is used to calculate the
amount of time you have for your next dive. Note, since you are entering the
water with a Pressure Group of D, your bottom time will not be as long as if
you entered the water with a Pressure Group A. Let’s figure out how much
time you will be allowed for your next dive.
The question is, what is the depth for your second dive? Let’s presume
45 feet. Locate the Pressure Group D found at the top of Table 3. Continue
following down the same column until you reach the line for the depth
you plan to dive. We said 45 feet. Since there is no row with 45 feet on it,
you much use the next deeper depth, 50.
Following the D column down to where the 50 foot depth row meets the
block containing a couple of nubers. Note each block is split into two values.
A value in a half white and a number in a half blue box. The specific box for
this example should contain 21 / 59.
Note near the bottom right of table 3 is a legend. There you will find an
explaination of what those two numbers mean. I’ll explain, The number at the
top (white section) is the residual time (the penalty). This number represents
the amount of Nitrogen, in time, still in the body. It is this time that must be
added to your actual Bottom time. Thats where the number in the blue
field represents, the new maximum amount of time at 50 feet.
In your case, you may spend no more than 59 minutes at 50 feet. Thats what
the 59 in 21/59 means.
Let’s plan the second dive to be no more than 59 minutes then. Let’s plan
for a 40 minute dive. So the question I have is, after spending 40 minutes
at 45 feet, what pressure group do you end up in?
(Turn to Table 1 to figure out your Pressure Group.)
Let’s walk through figuring what your Pressure Group will be after the
second dive.
Table 1 does not have a 45 foot depth, so we use the 50 foot column.
Add the 21 minutes of residual nitrogen time, (nitrogen still in your body)
to the Actual Bottom time of 40 minutes, you get 61 minutes.
Move down the column until you reach 61 minutes. There is no 61 minute
box, you round up to the next higher and nearest minute, which is 63.
What is your Pressure Group? If you said T, you are correct.
Lets summarize,
Dive tables exist so we have a tool to calculate bottom time or time we need
to spend on the surface between dive or to calculate our maximum depths.
Dive tables may be used in a number of ways. They represent a fundamental
tool in managing gas (nitrogen in this case) loading/unloading.
Dive tables exist for your safety. The more you use them, the easier they
become. It is important to understand tables for a number of reasons. One
of those reasons is they serve as a tool in calculating dive times, surface times,
nitrogen loads to help keep you out of decompression. Dive tables are not
secondary to computers but a compliment.
Exercise:
You are planning a three tank dive with some friends. Before you sit down to
discuss/plan the dives you want to show your friends that you are spot on
when it comes to calculating No Decompression times. You begin planning
some dives to present to your friends.
Here is what you are to plan:
( Calculate the MAXIMUM amount of time you may spend at each
subsequent depth. Show your work in your post. )
Your first dive will be to 87 feet for 20 minutes.
What is your pressure group after ending this first dive?
Your second dive will be to 58 feet for XXX minutes?
What pressure group will you enter the water with?
What Pressure Group do you end the second dive at?
Your third dive will be to 48 feet for YYY minutes?
What pressure group will you enter the water with?
What Pressure Group do you end the third dive at?
Larry Davis
Take the Recreational Dive Planner Quiz
© 2009 – 2021, lars2923. All rights reserved.


Written by lars2923
PADI MSDT - I've been a diver for over 33 years. I became an instructor because I want to be creditable and able to transfer my knowledge and skills to newer divers. Beside, it cuts down on the expense of diving. NOT! My Motto: First in, Last out
Filed under: Diver, Divetalking, Education, Open Water, RDP, Recreational Dive Planner, Reference, Training